CHOOSE A TEXT FORMAT

SPIRAL = fits more info
BLOCK = easier to read


ENTER LABEL TEXT

Use your most relevant and current information.

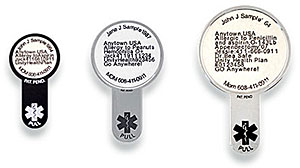
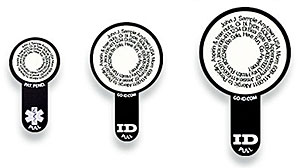
Top Arc: Start with your name, date of birth

Center Lines:

  • City, State, Country
  • Medical Condition or allergy(s)
  • Medication(s), Surgery(s)
  • Medication(s),or blood type,weight if child
  • Insurance provider & number
  • Emergency contact(s) 2 or more
  • Inspiring message

Bottom Arc: Emergency Contact #1 or #1 Medical condition or allergy

Use your most relevant and current information.

For example, begin with your name and date of birth, followed by your emergency contact, then your city, state, country, medical conditions*, allergies, medications, blood type, weight(if child), health insurance provider and number**.


CLICK HERE for information recommendations and suggested abbreviations.

After entering your information, click the button to update your preview.

UPDATE Preview


GO>ID does not record or store any of your personal ID information.

EMERGENCY ID INFORMATION GUIDE

BLOCK PATTERN: Most important information should be on top and bottom arc

SPIRAL PATTERN: Most important information should be first

What is most important to First Responders?

  1. Name, Date of Birth, City, State, Country
  2. Medical conditions and Surgeries
  3. Allergies
  4. Emergency Contacts (2 or more)
  5. Current Medications, Blood Type, Organ Donor
  6. Insurance Provider & Number

* If you can fit full terms/words do so, otherwise use common abbreviations, such as: COPD, NKA, HBP
** If you’re unsure of what to put you should consult your physician

PREVIEW

Follow the steps in order!

1 2 3
Mark an ‘A’ in a corner of a blank piece of printer paper. Empty the paper in your printer tray. With the A as your guide, note the exact position of the paper as you place it in your printer paper tray. You will need to position the same sheet of paper, in exactly the same way, for the second printing. Print your personal information by clicking on the green PRINT TEMPLATE button (see tip). Inspect the appearance and content of your printed text. If you need to make changes go back and re-enter your text to your satisfaction and perform this step again.

DO NOT scale, shrink, or fit the page with the setting on your printer -- it will shrink the text and circle and your label will not print at the correct size. Your printer should be set for letter size (8.5”x 11”) sheet of paper. Place the ID label over the printed circle to check -- it must fit exactly inside the printed black circle.

Make sure your hands are clean and dry. Using the correct white label for your type of printer (inkjet or laser, see tip), peel the slit release paper from the back of the label. DO NOT peel the front (inner) white label at this time. With the release paper removed, apply the label over your printed template from Step 1 so it is entirely within the borders of the black circle, as shown.

Your ID Making Kit includes both inkjet and laser labels -- be sure to use the correct label. The back of each label is either stamped with "INKJET" (or has a blue stripe) or it is stamped with "LASER ONLY" (or has a red stripe). A laser printer usually has a long (8" or greater) cartridge filled with powder. An inkjet printer typically has small box cartridges filled with ink. Your printer may have the word laser or inkjet as part of its name.

Using the 'A' as your guide, make sure you feed your paper exactly as you did before. Click "Print ID Label" below to print your information onto the ID label. If fed correctly, it will print directly onto the inner GO>ID label. Inspect the printed label to make sure all of your information is entirely within the smaller center label (no text should be printed on the outer ring).

If your text is off center or printed on the outer ring, your paper did not load the same as it did when printing your template. You may need to repeat Steps 1-3 with the extra labels provided.

1 2
Separate metal ID from its silicone cover by pulling at top where hole is, and sliding silicon cover off. Decide which side of the metal ID will show when you are wearing it:  or . This step is VERY important if you will wear your GO>ID on your watch. You will need to place your ID label on the side OPPOSITE of the symbol you want to show when wearing your watch (click the illustration at right for more information). Make sure your ID is clean and dry. Carefully peel off the inner printed ID label with minimal touching of the adhesive backing. Align within the round recess of the metal ID and press down firmly to apply.
Apply the clear over-lamination sticker from your ID Making Kit to protect your label from wear. Gently peel the backing off the clear laminate sticker with minimal touching of its adhesive backing. Carefully align the laminate over the printed ID label you just applied to your metal ID. The clear laminate should completely cover the printed label. Press down firmly on the laminate to remove any air bubbles. DO NOT attempt to lift and reposition the laminate -- will ruin the print on your ID label.
HOW TO ATTACH YOUR GO>ID TO A:

WATCH | KEYCHAIN | BACKPACK | SHOE | ZIPPER

WatchKeyring CarabineerBackpack
ShoeZipper Pull

To attach the GO>ID to your watch, use the black velcro hook (soft) and loop (rough) fasteners from the ID Making Kit. Make sure your metal ID is clean and dry. Remove the backing from the rougher hook fastener and place it within the round recess of the metal ID (on the blank opposite side from where you placed your ID label). Press down firmly to adhere.

Hold the ID to your watch to measure for placement. Remember you will want to wear the ID with the tab pointed toward your elbow for comfort (not toward your wrist). A watch worn on the left wrist will have the ID tab on the left side of the watch. The ID's alert tab should extend just beyond the edge of the watch. Clean and dry the back of your watch. Remove the backing from the loop fastener, align to the location on the back of your watch as you noted previously, and apply. Press the loop fastener firmly onto the back of your watch. Match the hook fastener on your metal ID to the loop fastener on the back of your watch. NOTE: Leave the ID in place for at least 24 hours for the adhesive to firmly harden.

For permanent attachment of the GO>ID to your watch, we recommend using a piece of permanent foam tape (not included). You may need to cut it to size for a custom fit (see inset photo).

KEYCHAIN BACKPACK SHOE ZIPPER

Unlace your shoes about half-way down. Thread both laces through the 2 holes in the back of the silicon cover (see illustration). Re-lace and tie your shoes as you typically do. Insert the metal ID fully into silicon cover. GO!

For Velcro® shoes you can attach GO>ID by utilizing a safety pin. Open the safety pin and feed it through both shoelace holes in the back of the silicon cover and close the safety pin securely. Slide the Velcro® between the slot in safety pin. Close the Velcro® strap while holding GO>ID in place. Make sure your GO>ID is visible.

WATCH KEYCHAIN BACKPACK ZIPPER

Use the included zipper hook from your ID Making Kit -- or your own key ring -- and thread it through the hole at the top of the silicon cover. Push the metal ID into the silicon cover. Attach zipper hook to your key ring, carabineer, etc.

WATCH BACKPACK SHOE ZIPPER

Hook the zipper hook from your ID Making Kit through the hole at the top of the silicon cover. Hook through the zipper pull as needed or through another place visible to first responders. Put metal ID into silicon cover.

DO NOT USE THE SILICON COVER AS A PULL -- the silicon cover will break.

WATCH KEYCHAIN BACKPACK SHOE

Use the included zipper hook or your own key ring and thread through the hole at the top of the silicon cover. Push the metal ID into silicon cover. Attach as you wish.

WATCH KEYCHAIN SHOE ZIPPER

Make My ID